OAL - OSD Menu
This is going to be a techninal breakdown of the OAL Menu produced by the Invoke-OALMenu.ps1 script in the OSD - Scripts - Prod Package. More low level details on how things functions I will link to the vender documentation. This isn't ment to be a guide on how to build future menus, just ment to be understand the OAL Menu functions in more detail.
Table of contents
General Information
Dependencies
- Powershell
- Windows Presentation Foundation (WPF)
This menu is using the Windows Presentation Foundation (WPF) framework for 2 reasons.
- I (Neil Feagan) have worked with in the past.
- Complexity/amount of line of code is substantially redunced.
Expanding on that second point, Windows Forms would take about 200 lines just to make a window with one button while WPF takes that same amount of lines to make the entire menu. WPF is also very similar to HTML, creating a familiarity with those who are managing it in the future.
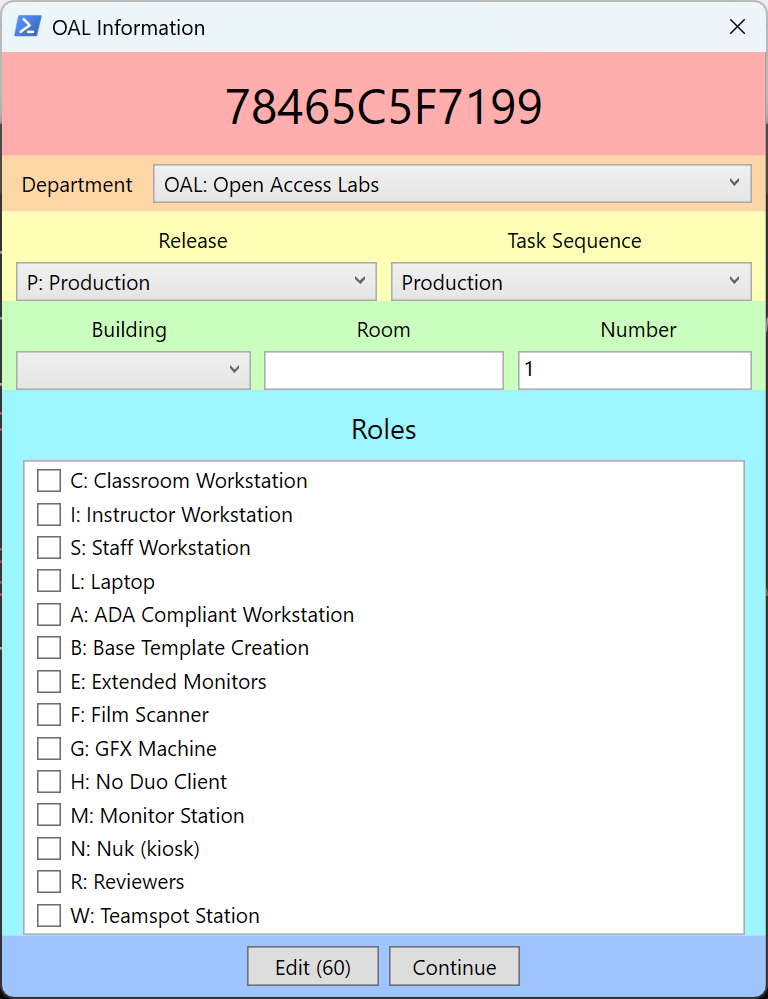
The current menu is a grid consisting of 6 rows. Depending on the row, columns may be used to add multiple option on one row.
Rows Visualized
Columns Visualized
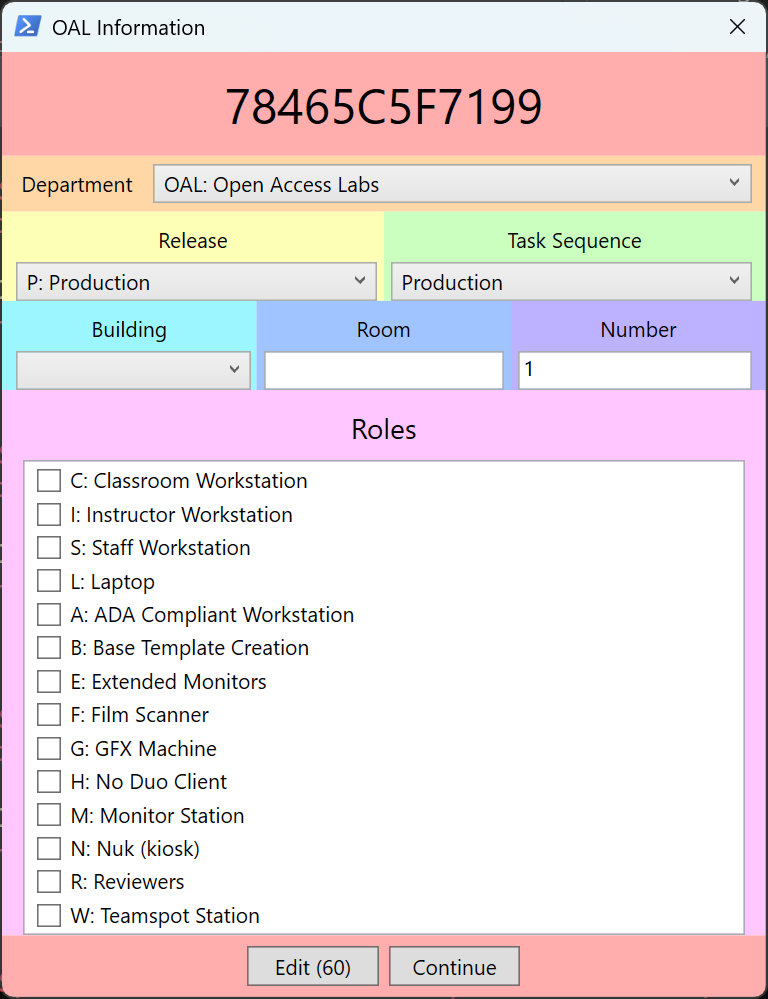
Beside the Title, everywhere else is using Stackpanel or Dockpanel. Like the name suggest this stacks or docks items in the elements.
Examples
Example 1: No values inputed. This will prompt the menu in edit mode
Invoke-OALMenu.ps1
Example 1: Prefilled. This lock the menu and start the time to auto close.
Invoke-OALMenu.ps1 -ComputerName "78465C5F7199" -Description "VRSC-504-001 (P-C)"
UI Elements
Basic rundown, of WPF. WPF contains Elements that have States, Properties, Methods, and Events. These can be used to create an interactive menu. Any Elements that need to be used must be named in the XAML and in the $NameElements array.
Named Elements Breakdown
| Script Name | Control | Description |
|---|---|---|
| LabelTitle | Label | Value presented and filled by the generated computer name or value from -ComputerName parameter. |
| LabelBuilding | Label | Label above the Building Dropdown. Label color changes to Red when not bulding is not selected. |
| LabelRoom | Label | Label above the Room Text Box. Label color changes to Red when value is not correct. |
| LabelNumber | Label | Label above the Number Text Box. Label color changes to Red when value is not correct. |
| ComboDepartment | ComboBox | Dropdown filled by setting the ItemSource equal to the $Departments variable. |
| ComboRelease | ComboBox | Dropdown filled by setting the ItemSource equal to the $Releases variable. Production is selected by default |
| ComboTask | ComboBox | Dropdown filled by setting the ItemSource equal to a Array. |
| ComboBuilding | ComboBox | Dropdown filled in using formated data from the $Buildings variable. The list is sorted so any additions will be formated correctly. This value is validated with user clicks the Continue button |
| TextRoom | TextBox | Text box to provide what room number the device is in. Value is validated when Continue button is pressed |
| TextNumber | TextBox | Text box to provide what device number. Value is validated when Continue button is pressed |
| ListRoles | ListBox | List of Roles utilizing a DataTemplate to dynamically fill available Roles from an generated Object array from the Get-CheckedRole. It also uses Data Bindings so the selection can be filled in. |
| ButEdit | Button | Button used to enter Edit mode. Only present if a Description is found or provided. Auto closes after the provided seconds value from the -Seconds Parameter. Default close time is 60. |
| ButContinue | Button | Button to continue after selection has been made and all necessary values are validated. |
Validation
All validation is done using a Regex string and a counter. If the amount of values needing to be validated of $Completed match the total count of $RequiredFields, the menu closes. This is all done in the Click Method of the Continue Button.
The labels of those options will be changed to Red when not valid.
Required Fields
| Label Name | Value | Regex | Check |
|---|---|---|---|
| LabelBuilding | ComboBuilding | '^\d+' | Integer greater than 0. -1 is no value has been selected |
| LabelLabelRoom | ComboBuilding | '^[a-zA-Z0-9]+' | String only containing letters and numbers. |
| LabelNumber | ComboBuilding | '^[1-9]+' | Integer greater than 1. No negatives values |
Code snippet
$WindowOALMenu.ButContinue.add_Click{
    $Complete = 0
    $RequiredFields = @(
        [PSCustomObject]@{Label = $WindowOALMenu.LabelBuilding;Value=$WindowOALMenu.ComboBuilding.SelectedIndex;MatchString='^\d+'}
        [PSCustomObject]@{Label = $WindowOALMenu.LabelRoom;Value=$WindowOALMenu.TextRoom.Text;MatchString="^[a-zA-Z0-9]+"}
        [PSCustomObject]@{Label = $WindowOALMenu.LabelNumber;Value=$WindowOALMenu.TextNumber.Text;MatchString='^[1-9]+'}
    )

    # Validate required fields
    $RequiredFields | ForEach-Object {
        if ($_.Value -match $_.MatchString) {
            $_.Label.Foreground = "#000000"
            $Complete++
        }
        else {
            $_.Label.Foreground = "#e33131"
        }
    }

    if ($RequiredFields.Count -eq $Complete){ $WindowOALMenu.DialogResult = $true}
}
Parameters
-ComputerName
Sets the Computer Name, mainly used for testing.
-Description
Sets the Description, mainly used for testing.
-Department
Sets the Department, mainly used for testing.
-Seconds
Sets the amount of seconds before the menu auto closes. Countdown is presented in the Edit button.
-OSD
When sets, the listed OSD Variables are gathered and set at the during the menu. All values given in the ComputerName, Description, and Department parameters will be ignored.
Gathered
- Computer Name : OSDComputerName
- Description : COMPUTERDESCRIPTION
- Department : DEPARTMENT
Set
- Computer Name : OSDComputerName
- OU : OSDDomainOUName
- Description : COMPUTERDESCRIPTION
- Department : DEPARTMENT
- TASK : TASK
Functions
Convert-XAMLtoWindow
This converts the XAML into the Windows object. This object is used to add Methods on the WPF Elements in the list provided in the NamedElement parameter.
Convert-XAMLtoWindow
    [-XAML <String>]
    [-NamedElement <String[]>]
Show-WPFWindow
Shows the menu.
Show-WPFWindow
    [-Window <Windows.Window>]
Get-CheckedRole
Generates the list of check roles to be inputted into the menu. Specifily inputted into ListRoles Element.
Get-CheckedRole
    [-Letter <String[]>]
Get-SelectedIndex
Outputs a integer tht is used for the SelectedIndex property of the dropdowns in the menu
Get-SelectedIndex
    [-List <String[]>]
    [-Item <String>]
    [-DefaultFirst]
Examples
Example 1: Get index of a Item known in the list
$List = @('A','B','C')
Get-SelectedIndex -List $List -Item 'B'
Output
1
Example 2: Get index item is not in the list
$List = @('A','B','C')
Get-SelectedIndex -List $List -Item 'D'
Output
-1
Example 3: Default to first item when item is not in the list
$List = @('A','B','C')
Get-SelectedIndex -List $List -Item 'D' -DefaultFirst
Output
0
New-ComputerName
Creates a new computer name. This is used mainly during testing when the ComputerName parameter is null. This function is able to generate 2 types of names (MAC & Serial). The Department is used for the Serial type to add a prefix to the name.
For Intune deployments the Computer Name is ignored and is only for show. Intune sets the computer name based on a Template set in the scoped AutoPilot Profile.
New-ComputerName
    [-Type <String>]
    [-Department <String>]
Convert-OALDescriptionToOALObject
Creates a object to be use and edited during the menu. Mainly this function splits the Description into the Release, Building, Room, Number, and Roles.
Convert-OALDescriptionToOALObject
    [-ComputerName <String>]
    [-Description <String>]
    [-Department <String>]
Examples
Example 1: Create a object
Convert-OALDescriptionToOALObject -ComputerName "78465C5F7199" -Description "VRSC-504-001 (P-C)" -Department "OAL"
Output
ComputerName  : 78465C5F7199
Department    : OAL
Release       : P
Building      : VRSC
Room          : 504
Roles         : C
Task          :
OU            :
Convert-OALObjectToOALDescription
Converts the object made from Convert-OALDescriptionToOALObject back into a readable Description.
Convert-OALObjectToOALDescription
    [-Object <System.Object>]
Databases
All databases are stored in the script. They are either varibales or arrays inputed into the ItemSource of the Element. These really should be pulling from some external database to limit human error when editing but I wasn't able to do so in the time frame given.
| Name | Type | Script Location | Notes |
|---|---|---|---|
| Departments | Variable | $Departments | Departments is the Abbreviation, Name and OU of the department. Edit it by updating the values. |
| Buildings | Variable | $Buildings | A formated and sorted data is pesented to the user and split apart to be used in the final Description. To edit, simply find the entry you want to change or use the commented out template at the top of the Array to make a new one. |
| Releases | Variable | Releases | Shouldn't need to be edited but Name is what is presented to the User while Letter is what is used. |
| Roles | Variable | $CheckedRoles | The list of roles are stored in the Get-CheckedRole function |
| Task | ItemSource | $WindowOALMenu.ComboTask.ItemsSource | This needs to match the sub tasks in the Main Task Sequence. If you know a sub tak is problematic you can simply removed the task from the array. |